Saturday, 5 May 2012

Chassis welded and ready for painting

The chassis now delivered to Aliblast services for sand blasting and painting with PoR two pack chassis paint. The items that are non-standard are as follows:
* Increased passenger leg room requiring a custom fuel tank (see below) and some metalwork changes to the foot well.
    * GRP racing seat installation requiring mounting lugs to chassis and change of steering position where the column exist the chassis, more forward and lower.
* Mounting lugs for Battery Fuse Box and Offside Fuse Box. This enables the use of VVT ECU from Ford Puma.
    * Mounting lugs for Focus header tank which is a good fit in the J15.
* Add extra steering bush at end of column
    * Mounting points for anti-roll bars.


The fuel tank arrived from Allyfab (Bryn Jones) fabulous job, even sorted my cockup with the return pipe.


    The wiring harness is in production.This involved production of circuit diagram, ecu mapping to Battery fuse box chart and Chassis loom routing chart. All of this information can be sent to you if it is of any use to you.


    Off to Stoneleigh for more bits! There may be a delay before more progress can be reported!

Tuesday, 1 May 2012

Gear stick, ancillary harness, serial plate


The gear stick is from the Puma donor, which is too long so off came about 50mm and added the racing Puma knob purchased s/h off where else:- ebay

The wiring harness is divided into two like the Puma: The Battery junction box and ECU and the lighting and ancillary harness or Offside fuse box in this case. I created a harness jig based on the accurate measurement of the chassis. This allows me to move the chassis around and still work on the wiring.

After reading the Locost forum on such matters, I came to the conclusion at least two locations for the VIN are required. One that cannot be removed and one on the nearside chassis member that is more obvious to the inspector. The chassis number cannot be punched into the chassis without cutting a bit out first. I plan to weld a plate in instead. The bulkhed is the only other place that has enough strength to have a naked punched serial number.


Nearside chassis location


References


Locost thread on VIN: http://www.locostbuilders.co.uk/viewthread.php?tid=166395

Contents http://sylvabuild.blogspot.co.uk/2012/01/sylva-j15-is-kit-car-designed-by-jeremy.html

Thursday, 19 April 2012

Revisit the steering coupling

A very nice chap called Angus had a look at my steering couplings and offered the opinion that it may foul the inboard suspension cantilever. After much angst I had to agree with him so I spent the next day modifying the steering so the shaft now comes out into the front foot well where the designer intended. It involved fairly extensive mods to the foot well, lower bracket and lower bearing position.

The plate illustrated below was uprated to 3.5mm and hung upside down.
 The coupling now exits in it's original position as designed but needed a repair to the footwell.

This is as low as the steering shaft can go so if it is wrong now then that would be a problem.

References

Contents http://sylvabuild.blogspot.co.uk/2012/01/sylva-j15-is-kit-car-designed-by-jeremy.html


Header tank

The header tank posed more of a problem than envisaged. I put a post on the Locost forum and some very straight forward advice was given as usual. I am not the conventionalist however so I decided to consider the design problem perhaps the solution was not as simple as it seams.

* The header fluid level must be above the thermostat housing (or in this case the temperature sensor as the thermostat is in the return path in a Ford Sigma).
* The rear hood/bonnet slopes away at the back reducing the available height for locating the header tank.
* The air filter is in the top near side in a Sigma as installed in a J15.
* The capacity must be adequate, at least a litre
* It must NOT be mounted on the engine support as vibration could destroy the tank.

The Ford Focus ST MK1 tank is ideal all you need is a support bracket that took 4 hours to fabricate.

References

Contents http://sylvabuild.blogspot.co.uk/2012/01/sylva-j15-is-kit-car-designed-by-jeremy.html

Tuesday, 10 April 2012

Trial engine fit

Trial fitting the engine

Decided that I need to trial fit the engine in the unpainted chassis:
* Reduce the bodge marks on the chassis paint
* Solve any bracket problems
* Solve the aux belt pulley problem
* Fit the exhaust
* Check the Racing Puma Plenium fit

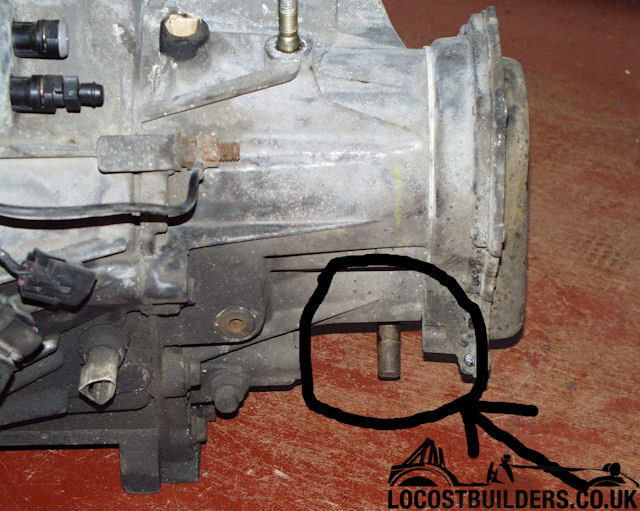
I bought an engine crane and a balance bar attachment, this aided single handed engine fit. The biggest problem was a device that stuck out the bottom of the gearbox, called an indent spring that totally prevented fitting. The Sigma engine has two of these one for forward gears and another for 5th gear apparently.


The other problem was with the offside mount that needed extensive surgery to make it fit and still be able to get the alternator off.

The problem with the Sigma belt system is I want to remove a) The PAS pump and b) the Aircon pump locations. This hardware adds considerably to the weight and it is complications a kit car can do without, just like Airbags, electric windows, alarm systems, electric everything etc etc. Identification: 1)belt, 2) Idler wheel, 3) Alternator, 4) PAS pump, 5) Engine pulley, 6) Water pump 7) Tensioner
The issue is the engine is 15 years old and versions without PAS pump are few and far between. The only car I could find without Aircon was on a pile 3 high in the scrappy. I looked on ebay but it was hard to identify the bits. So I made a replacement bracket for the Tensioner as the existing one was a heavy steel casting and originally housed the Tensioner and Aircon pump but without the Aircon pump the tensioner was in the wrong place. The PAS pump was to be changed into an idler wheel from a Transit.
 The Tensioner bracket was fabricated in cardboard first then welded up in 6mm mild steel plate from the patterns produced.


The (replacement PAS) v pulley idler shaft was fabricated/turned in the lathe and attached to the fabricated body.
The exhaust is important at this stage, if I want to run up the engine that was restored by Sitec. With a piece of luck I found the original exhaust from the westfield SEIW that I run about in, it has a built in cat and fits ideally to the Sylva. I got Graden of Stainless Creatrions to make me some pipework to connect up to the Sylva supplied manifold.


References


Contents http://sylvabuild.blogspot.co.uk/2012/01/sylva-j15-is-kit-car-designed-by-jeremy.html

Thursday, 22 March 2012

The rack and pinion steering

My Escort rack and extension steering shaft arrived from Rally Design today. The shaft is 14mm x 36 splines on each end of a 380mm x 15mm shaft = £20.00. I decided to change the original design in this area to give the steering shaft more support. The modification mostly relates to where it comes out of the bulkhead by adding another bearing .

 So.... I cut the shaft and joined it to the Puma shaft. I then found I had enough material left with a spline already machined on one end. I then I looked up the mechanical engineering forums and found out how to cut a spline. Amazingly I found I had all the kit already would you believe.

Set about machining the cut end and found it was made of a very hard alloy like silver steel. I have come across this in clocks, pins and small shafts before but not in any automotive context. Considering the application I was reassured it was made of this stuff for a reason. Anyway by careful technique I turned the shaft to exactly 14mm in the lathe. Then I set up the mill and cut the spline. All done with TC cutters I have already.

Result, complete success


References

Contents http://sylvabuild.blogspot.co.uk/2012/01/sylva-j15-is-kit-car-designed-by-jeremy.html


Sunday, 18 March 2012

Summary to date March 2012

Progress - very slow to get project off the ground....

First job I tackled was a redesign of the fuel tank. Well! the new tank design stretched my brain but now the changes to the chassis still have to be incorporated. Apparently you must keep the fuel isolated from the passenger compartment, quite sensible requirement really. The actual welding is a piece of piss but the thinking time is huge.

With the fuel tank itself, I am making a mounting plate for the aircraft style filler next week on my lathe/mill. Need this before I send the cardboard model and drawings to have the whole lot fabricated by Allfab.

The choice of GRP seat has set me back weeks. I chose MK Engineering racing seats, this resulted in all sorts of  problems with the steering column and re-welding of the chassis. This has a big impact on the progress rate.

I am turning my attention to the extension of the Puma steering column lower part. I am not happy with the support (lack of) in it's extended form. I think I am going to add another steering support bearing at the exit point to the rack.

The engine is due back soon, spent way over budget getting more horses out of it. I don't know yet how many horses as I need the car on the rolling road which is a long way off. I am going to do a trial fit of the engine in the chassis before getting the chassis painted. I am still trying to decide where to put the fuse box and the battery?

I am off tomorrow to the Glasgow IVA station with a friend that is trying to get a 2B through. I think this will be invaluable insight into the process.

P.S. This months Kitcar mag has an excellent section on the IVA and a fabulous article by Jeremy on the J15.
Drawing sent to Alifab
P.S. I also have an engineering drawing for the tank.

Contents http://sylvabuild.blogspot.co.uk/2012/01/sylva-j15-is-kit-car-designed-by-jeremy.html